11 Levels of Prosthetic Makeup: Easy to Complex
Released on 10/28/2022
I'm Meg Wilbur, and today I've been challenged
with explaining prosthetic makeup
in 11 levels of increasing complexity.
[spooky electronic music]
Special effects makeup is a really broad umbrella.
There's old age, bald caps, spotty painting, face painting,
all sorts of different things.
I'm defining complexity as flourishes, different textures,
the small minutia details that are often overlooked
or are not easy to replicate.
Level one, temporary tattoo application.
Crafting a demon can be approached
in a lot of different ways.
I have decided to create mine around the idea
of someone going and getting a tattoo
that didn't quite mean what they thought it did,
travels through their bloodstream,
and turns them into a demon.
For this step, we're gonna be using something
called Pros-Aide adhesive.
It's sort of like a liquid bandaid.
It's literally a medical adhesive.
I'm laying down a layer of adhesive
to help the tattoo transfer stick
to the skin just a little bit better.
We are going to put on a layer of Pros-Aide on top of that,
and that's just to seal it into the skin
to really make sure that it's not gonna go anywhere.
That's just another layer of insurance.
And then after we get that layer of Pros-Aide on there,
we're gonna powder it down.
This is gonna help marry it into the skin.
It's also gonna keep the Pros-Aide from being sticky.
And after we get that layer of powder on there,
our final step is to kind of wipe it off,
make sure that it's all matted down, and ready to go.
Level two, multi-brush application.
So for this one, we're going to use a nice red tone
to really express how irritated and angry this tattoo is.
It's starting to get infected,
and the way that we're going to apply it
is using stipple brushes.
Stipple brushes are duo fiber brushes.
You can always identify them.
They have a short section of bristles
and a long section of bristles.
So I like stipple brushes for this in particular,
because they give a almost pointillistic,
just gives you something nice and soft
that you can continue to work with.
So in this level,
we are introducing the use of alcohol paint,
and the reason that I like alcohol paint the most
is because you can use it like a watercolor
It builds up in washes, and it looks really subtle.
If you think about skin as an organ,
it's layered on top of other things,
and alcohol paint has the translucency
to mimic actual things that happen on your skin
without looking as opaque and stagey
as a cream makeup might.
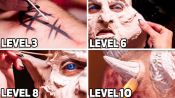
Level three, veining.
We're at the part of the story
where the infection is starting to enter the bloodstream.
So, the brush that I'm gonna be mainly using for this
is a very, very fine point brush.
It's a 6-10.
In order to get the effect of really cool veining,
which is just to show the actual veins
that are capillaries of your arm,
we are going to be using our stippling technique.
It leaves behind these little points every so often,
and I like to use them as the groundwork
for creating really cool veins.
The cool thing about alcohol paint
is that because it is applied in washes
and it is so translucent,
you don't have to be committed to anything.
And because we've stippled paint on
and there are voids in areas where there's not as much paint
or there's no paint at all,
you can get away with doing things like that.
If you oversaturate the skin with alcohol
and attempt to touch paint onto it, it'll bleed.
It'll balloon or blossom.
And another thing to look out for
is you can't use a ton of pressure and drag it across
with multiple colors.
You'll start to pick up the layers underneath.
It is very easily reactivated.
Level four, creating dimension.
So so far, all of our techniques
have been two-dimensional techniques.
For this level, we are adding an additional third dimension
to things, so we can pop out some blisters
and really add to our look by giving it a little hype.
For this level,
we're gonna be using a two-part silicone complex.
They stay totally uncured when they're separate.
When you mix them together,
they cure into little silicone pieces,
and they can go right on the skin.
It's a platinum-based silicone,
and I'm gonna add a catalyst to it
to just make it cure just a little bit faster.
That way we can make sure that our little dots
that we put on the skin stay raised dots.
After we get those dots on the skin
in the areas that we want them,
we're going to add a little bit of alcohol paint
on top of them just to give them a little extra pop
to really show that they are pussy and infected.
I'm gonna be using a filbert brush to go in
and around these little blisters that we've created
to give them a little more dimension.
And I'm going to use a flat-ended brush
to add the yellow color to the blisters.
I am using yellow, because yellow puss,
and I'm going to be using a little more
of that angry red color around the base of those pustules,
so that I can really pop them out
and make sure that they read well.
Next level, I'll be increasing complexity
introducing texture to our look.
Level five, creating texture.
We will be using something called Egyptian Magic.
Egyptian Magic is something that you can use
to add a glossy sheen to your pieces.
Many industry professionals use KY jelly
for almost everything.
And for this, we don't really need it to be goopy or gooey.
We just want it to be very slick and wet-looking.
So I tend to gravitate towards the Egyptian Magic,
because it's easy to apply.
It's shiny without being too shiny.
It's not too wet.
It's not too runny.
You can control it pretty well,
and it really makes things look quite good.
So the way in which we're increasing complexity
is by increasing our visual language.
In order to do that,
we are adding different levels of texture,
different pieces to really make it come together.
If you wanted to make something goopy or gooey
like think about Neo coming out of that pod
for the first time in The Matrix,
that's a substance called methylcellulose,
which is a plant-based food thickener,
totally consumable, totally flavorless,
but it is actually something that you would buy
as a powdered substance and then boil on the stove.
I know, because I've done it
Level six, prosthetic application.
So story-wise, our model is now going fully
off the deep end and becoming a full-on demon.
For the sake of the schedule of our episode,
we've gone ahead
and acquired a pre-made demon face appliance.
In a larger production,
I would prefer to craft my own demon face
to control as much of the creature's design
as I possibly can.
And in order to achieve this look,
we are going to be applying a full face
facial prosthetic appliance, as well as two ear appliances,
one to each ear, and then two sets of horns.
I've asked our model to go ahead
and insert his own contact lenses
prior to our facial transformation
as a safety precaution.
For this level,
I'm gonna have my friend Brittany Turpen help me.
She is going to assist me through the application process,
and in order to make our application
as easy and seamless as possible,
our first step is going to be to prep the skin.
We're gonna use another round of that toner.
This time, we are also going to apply something
known as Skin Saver.
It's a lotion that you put on that acts as a barrier cream.
Your skin on your face is very thin,
much thinner than the skin on your arms
or the skin on your legs.
So we wanna treat it with a little bit more TLC.
Removing a full facial appliance at the end of the day
can be quite a task, and we want to make sure
that he walks away feeling as fresh as a spring chicken.
Our second step is going to be
gluing down our model's eyebrows, which might seem crazy,
but we will be using a silicone-based adhesive
known as Telesis.
The next part of this application
will be holding the facial appliance
up to Andrew and seeing how it fits him.
We're gonna decide on exactly how we want it to be placed,
and then we're gonna take a powder puff
and powder around the edges of it,
so that we know exactly where we want it to lay,
so that when we go to actually glue everything down,
we know exactly how it lines up on his face.
Since we are using generic prosthetics for this,
it is kind of impossible to say
if things will fit him perfectly until we see it near him,
and it's very likely that they won't fit like a glove.
It's very common for there to be minor fit issues,
especially if you don't get a makeup test.
There's a variety of ways that you can handle that.
Sometimes we use things called blenders.
They're little patches of very thin foam latex
that you can just apply to bad, saggy, crazy edges
[chuckles] to make sure that people can't see them.
For this application,
we're going to be using the same silicone glue
that we use to glue down our model's brows
instead of the Pros-Aide that we used for the tattoo.
There is something that goes with it called thinner,
which just kind of thins out the consistency
of that very thick silicone-based glue,
and sometimes instead you can use that thinner
to lift an edge that got pushed down too quickly.
It adds so much more flexibility to your application.
Whereas with Pros-Aid, once it's down, it's down.
That's it, that's all you got, good luck.
For our next level, we'll be increasing complexity
by painting and sealing with pax paint,
which will seal the foam
and also help us start to match our model's skin tone.
Level seven, stippling with pax.
So in this level, we are going to be using something
called pax paint, which is a mixture of Pros-Aide adhesive
and acrylic paint.
The reason that we're going to be using that next
is because we must seal the foam completely
before we can move on to using any of our airbrush
or alcohol colors, because foam is really porous,
and it will absorb anything that's super wet
if you don't seal it first.
So the acrylic and Pros-Aide mixture creates a film,
a plastic film over it that is totally skin-safe.
Acrylic paint is very flexible.
So this mixture of it and the adhesive actually flexes
with you, so you'll still be able to move all around
without it cracking off like you would think
that house paint would, but it also seals it,
so that we can then in our next steps
use our favorite paints to really make things come to life.
In level two, we used alcohol paint
and brushes to do stippling.
In this level, we're going to be using
non-latex white sponge
to create a very similar type of texture,
but we're using sponge, because the pax paint
can easily ruin your brushes,
and those brushes are quite expensive.
So we wanna make sure we take very good care of them.
In order to create that texture with the sponge,
what I do ahead of time is I will take the sponge
and rip it up and then use that
to create this dimensional texture with our pax paint.
The worst mistake you can make
with pax paint is to use way too much of it.
It is a nightmare to remove.
There are instances in which we'll use pax paint
like on hands or for movies where it's a totally blue guy
and you have to do what you have to do,
but it's not preferential to use pax paint anywhere
except for where you absolutely need it.
Level eight, spattering.
While it may seem
like applying the prosthetics is actually more difficult
than what our next step is going to be,
it's something that has to be done
before we can achieve our next level.
I'm going to be using one of my favorite airbrush guns
to help elevate our look of actual skin texture
and actual skin color.
So we will be really trying to nail down that skin tone
and nail down the look of our skin.
We don't really wanna touch it
after this level to adjust the skin.
We're just gonna move on
to other parts of painting after this.
I like to use the spattering gun
to start things off at least.
There are plenty of other spatter.
You can use a a chip brush that you cut off the top.
I like to start with my airbrush,
because it's the most uniform spray
whereas when you're doing something by hand,
it is dependent upon how you are flicking it,
how it's feeling.
Because I'm also trying to nail a color,
I want to make sure that my color is uniform
before I start adding in more unique touches.
The reason that I am going to use the chip brush
near the eye area
is because we want to blend down those edges,
but I know that I'm going to be doing a different
than flesh paint scheme in the eye area ultimately.
So I'm not quite as concerned with the uniformity of that
in the eye area, and I'm going to be using my airbrush gun
for the overall effect on the rest of the prosthetic.
The types of paints that we're gonna be using for this,
not just skin tone paints,
but we are also going to be using color adjusters as well.
Color adjusters that you might come across
even in the makeup store when you go,
you get your corals, you get your rose adjusters,
you've got olive adjuster.
I'm a big fan of adjusters.
I love them.
I feel like they are the easiest way
to make things really start to look real.
You can get caught up in the minutia
of using a bunch of different skin tones,
but at the end of the day,
once you've gotten in the realm of your skin tone,
it will be really be up to the adjusters
to come in and save the day for you.
If your paint is super thin,
you're gonna wind up doing about 7,000 passes
with your airbrush gun
before you finally start to see something happening,
but you don't want your paint to be too pigmented as well,
because then you're just gonna see like freckles everywhere,
just a million freckles of everything,
and that gets to be very overwhelming.
It's a push and pull of, okay,
for this pass, I think I'm gonna do super translucent.
Then maybe the next pass with a different color,
I'm gonna get a little bit bolder with it.
I'm gonna back off with the translucency.
You really learn those things through trial and error.
I try to start pretty loosey goosey with it,
and then once I start feeling like,
okay, we've got our skin tone nailed down,
I'm gonna start adding my freckle tone.
I'm gonna add my dark freckle tone.
I just like to make sure
that I give myself a little bit of wiggle room,
so I'm not like committed to a barrage of dots off the bat.
In our next level, we're going to be increasing complexity
by starting to really hone in on our character.
We're going to be using techniques known as modeling
and patterning to breathe a new life into this character
now that we have already nailed down the fleshiness
and the skin tone of it
and just start to really make our character sing.
Level nine, modeling and patterning.
Modeling is a term that refers to what happens with blood
in the skin of dead bodies,
and it is this very dappled blood pooling that happens.
It is something that we use as a technique
of paint application in the special effects world,
not just when we're simulating zombies or dead bodies,
but also that term has come to transcend
just that application and start to refer
to the look of breaking up the skin
in a way where the paint ebbs and flows
where you get some areas that have this definition
and other areas that don't have it quite as much,
and it's a very gorgeous technique.
Patterning, think of it like a snake.
It's like the actual pattern
of how the paint is going to go on
or how your look is going to wind up.
I am going to achieve our modeling and patterning
through use of a more precise airbrush gun.
This is going to be a smaller spray pattern
and a smaller airbrush gun in general.
And I am going to use modeling techniques.
Some people refer to it as like your crazy eights
or your your eight patterns, my favorite,
and it's one of the easiest to fly through,
but it is really just a way of applying paint
in a non-uniform uniform way to break up the skin.
And I will pattern over that with the same airbrush gun
in a very similar manner to how we did our veining.
I'm gonna follow the lead of my modeling
and see how it turns out and where it goes.
And then I'm gonna go in there and I like to dot
with my patterning, so we're gonna do that.
This is the level and the step in this application
where you can really let your artistry come
to the forefront of things.
In the previous levels, in the previous steps,
we've been just focused on trying to create as much realism
as possible, and this is where fantasy starts to take over.
This is where your ideas and and your beliefs
about how you want your character to turn out,
that's where this can come to the party
and take the lead.
Level 10, dry brushing and marrying.
In level 10, we're increasing our complexity
by using the techniques of dry brushing in particular
and also the idea of marrying all of our things together.
We will be using these to just solidify what we've done
in the previous levels and make sure
that everything comes together to create one very uniform
and very put together piece.
Previously to this, we have ignored the eye orbit a bit,
and we are going to be using cream makeup
to really bring our paint job down into the eye orbit.
We're gonna use a little bit of eyeliner in the eye
to marry our effects paint job and our actual areas
that I wouldn't wanna use alcohol paint, for instance.
I'm not gonna use alcohol pain on somebody's eyelid.
That's a little mean.
I am going to use beauty makeup
in a non-conventional beauty way to bring some more life
into this and to really keep things
in the realm that I wanna keep them in,
which is to move away from human and to move into fantasy.
And I'm going to be using a technique known as dry brushing.
Previous to this,
we've been using wet application techniques
where the paint is very wet as we apply it.
In this in particular with the horns,
we're gonna use a dry brushing technique,
which is where you try to get as much of the water,
whatever you used to activate with off the brush
and keep the pigment on it,
and then brush that onto the horns
to enhance the texture of it,
and then leave some of that paint
that was already on the horn in the areas that you want it.
So really what this does is it adds pigment
to the raised parts of the piece
and leaves what you already had
into the crevices and recesses of it.
Level 11, final reveal.
For the final level,
I am taking a dental impression from my model,
and I am going to create a custom set of dentures for him,
so that we can add something special to this
that is not purchasable in stores
like every other piece that we have done previously.
I'll also be adding nails to the look
and a little bit more flare, a little demon blood,
a little sass there.
And these elements are often overlooked,
but so important to helping tell a story.
They really change the entirety of the makeup.
They really help sell it a little bit more.
And I find them to be
some of the most fascinating parts of makeups.
I mean, think about all those scary things that you've seen
with like creepy teeth all over them.
So like, yeah, we're gonna add a little creepy teeth
to this guy.
[spooky electronic music]
Thanks so much for watching.
I hope you guys learned something new
about prosthetic makeup that you didn't know before,
and hopefully I've piqued your interest enough
to help you win the Halloween costume contest this year
at your job.
Good luck.

16 Levels of Piano Composition: Easy to Complex
21 Levels of Skateboarding: Easy to Complex

6 Levels of Knife Making: Easy to Complex

11 Levels of Origami: Easy to Complex

10 Levels of Ice Sculpture: Easy to Complex

13 Levels of Beatboxing: Easy to Complex

11 Levels of Self-Portraiture: Easy to Complex
26 Levels of Yo-Yo Tricks: Easy to Complex
22 Levels of Cardistry: Easy to Complex

24 Levels of Balisong Flipping: Easy to Complex

13 Levels of Pumpkin Carving: Easy to Complex

21 Levels of Dunking: Easy to Complex

15 Levels of Pool: Easy to Complex

12 Levels of Graffiti: Easy to Complex

15 Levels of Turntablism: Easy to Complex
11 Levels of Prosthetic Makeup: Easy to Complex

Levels of Knot Tying: Easy to Complex

13 Levels of Drumming: Easy to Complex

21 Levels of Pen Spinning: Easy to Complex
21 Levels of Ballet: Easy to Complex
25 Levels of Freestyle Soccer: Easy to Complex